Одно из главнейших достоинств PHP - то, как он работает с формами HTML. Здесь основным является то, что каждый элемент формы автоматически становится доступным вашим программам на PHP. Для подробной информации об использовании форм в PHP читайте раздел . Вот пример формы HTML:
Пример #1 Простейшая форма HTML
Ваше имя:
Ваш возраст:
В этой форме нет ничего особенного. Это обычная форма HTML без каких-либо специальных тегов. Когда пользователь заполнит форму и нажмет кнопку отправки, будет вызвана страница action.php . В этом файле может быть что-то вроде:
Пример #2 Выводим данные формы
Здравствуйте,
.
Вам
лет.
Пример вывода данной программы:
Здравствуйте, Сергей. Вам 30 лет.
Если не принимать во внимание куски кода с htmlspecialchars() и (int) , принцип работы данного кода должен быть прост и понятен. htmlspecialchars() обеспечивает правильную кодировку "особых" HTML-символов так, чтобы вредоносный HTML или Javascript не был вставлен на вашу страницу. Поле age, о котором нам известно, что оно должно быть число, мы можем просто преобразовать в integer , что автоматически избавит нас от нежелательных символов. PHP также может сделать это автоматически с помощью расширения filter . Переменные $_POST["name"] и $_POST["age"] автоматически установлены для вас средствами PHP. Ранее мы использовали суперглобальную переменную $_SERVER , здесь же мы точно так же используем суперглобальную переменную $_POST , которая содержит все POST-данные. Заметим, что метод отправки (method) нашей формы - POST. Если бы мы использовали метод GET , то информация нашей формы была бы в суперглобальной переменной $_GET . Кроме этого, можно использовать переменную $_REQUEST , если источник данных не имеет значения. Эта переменная содержит смесь данных GET, POST, COOKIE.
15 years ago
According to the HTTP specification, you should use the POST method when you"re using the form to change the state of something on the server end. For example, if a page has a form to allow users to add their own comments, like this page here, the form should use POST. If you click "Reload" or "Refresh" on a page that you reached through a POST, it"s almost always an error -- you shouldn"t be posting the same comment twice -- which is why these pages aren"t bookmarked or cached.
You should use the GET method when your form is, well, getting something off the server and not actually changing anything. For example, the form for a search engine should use GET, since searching a Web site should not be changing anything that the client might care about, and bookmarking or caching the results of a search-engine query is just as useful as bookmarking or caching a static HTML page.
2 years ago
Worth clarifying:
POST is not more secure than GET.
The reasons for choosing GET vs POST involve various factors such as intent of the request (are you "submitting" information?), the size of the request (there are limits to how long a URL can be, and GET parameters are sent in the URL), and how easily you want the Action to be shareable -- Example, Google Searches are GET because it makes it easy to copy and share the search query with someone else simply by sharing the URL.
Security is only a consideration here due to the fact that a GET is easier to share than a POST. Example: you don"t want a password to be sent by GET, because the user might share the resulting URL and inadvertently expose their password.
However, a GET and a POST are equally easy to intercept by a well-placed malicious person if you don"t deploy TLS/SSL to protect the network connection itself.
All Forms sent over HTTP (usually port 80) are insecure, and today (2017), there aren"t many good reasons for a public website to not be using HTTPS (which is basically HTTP + Transport Layer Security).
As a bonus, if you use TLS you minimise the risk of your users getting code (ADs) injected into your traffic that wasn"t put there by you.
RxGroovy has several Do variants.
- Javadoc:
- Javadoc:

- Javadoc:
The doOnRequest operator (new in RxGroovy 1.1) registers an Action which will be called whenever an observer requests additional items from the resulting Observable. That Action receives as its parameter the number of items that the observer is requesting.
- Javadoc:

- Javadoc:
- Javadoc:

- Javadoc:

- Javadoc:
before
- Javadoc:
after the resulting Observable terminates, whether normally or with an error.
Sample Codedef numbers = Observable.from(); numbers.finallyDo({ println("Finally"); }).subscribe({ println(it); }, // onNext { println("Error: " + it.getMessage()); }, // onError { println("Sequence complete"); } // onCompleted);
1 2 3 4 5 Sequence complete Finally
- Javadoc:
RxJava has several Do variants.
The doOnEach operator allows you to establish a callback that the resulting Observable will call each time it emits an item. You can pass this callback either in the form of an Action that takes an onNext variety of Notification as its sole parameter, or you can pass in an Observer whose onNext method will be called as if it had subscribed to the Observable.
- Javadoc:
- Javadoc:
The doOnNext operator is much like doOnEach(Action1) except that the Action that you pass it as a parameter does not accept a Notification but instead simply accepts the emitted item.
Sample CodeObservable.just(1, 2, 3) .doOnNext(new Action1() { @Override public void call(Integer item) { if(item > 1) { throw new RuntimeException("Item exceeds maximum value"); } } }).subscribe(new Subscriber() { @Override public void onNext(Integer item) { System.out.println("Next: " + item); } @Override public void onError(Throwable error) { System.err.println("Error: " + error.getMessage()); } @Override public void onCompleted() { System.out.println("Sequence complete."); } });
Next: 1 Error: Item exceeds maximum value
- Javadoc:
The doOnRequest operator (new in RxJava 1.1) registers an Action which will be called whenever an observer requests additional items from the resulting Observable. That Action receives as its parameter the number of items that the observer is requesting.
- Javadoc:
The doOnSubscribe operator registers an Action which will be called whenever an observer subscribes to the resulting Observable.
- Javadoc:
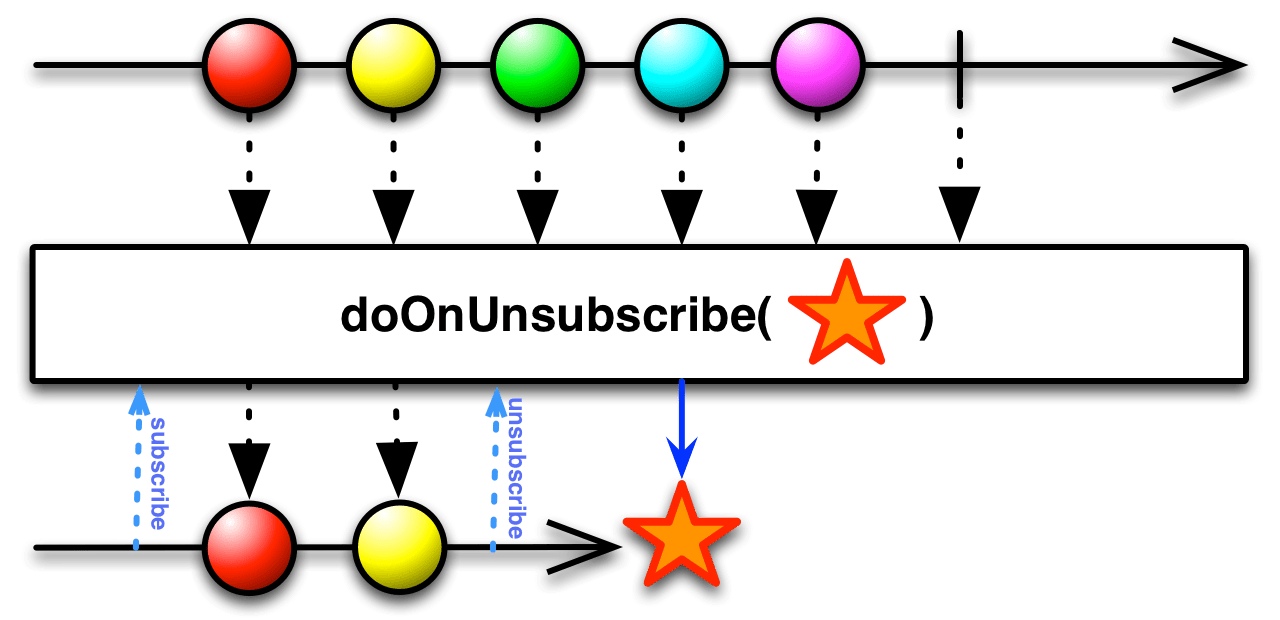
The doOnUnsubscribe operator registers an Action which will be called whenever an observer unsubscribes from the resulting Observable.
- Javadoc:
The doOnCompleted operator registers an Action which will be called if the resulting Observable terminates normally, calling onCompleted .
- Javadoc:
The doOnError operator registers an Action which will be called if the resulting Observable terminates abnormally, calling onError . This Action will be passed the Throwable representing the error.
- Javadoc:
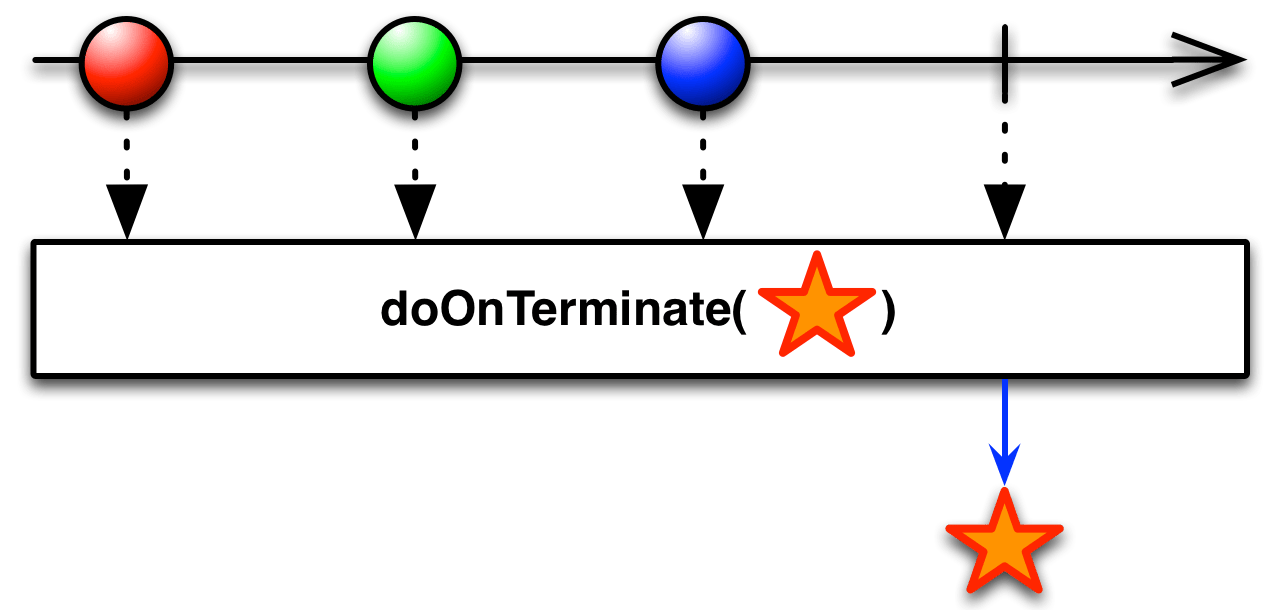
The doOnTerminate operator registers an Action which will be called just before the resulting Observable terminates, whether normally or with an error.
- Javadoc:
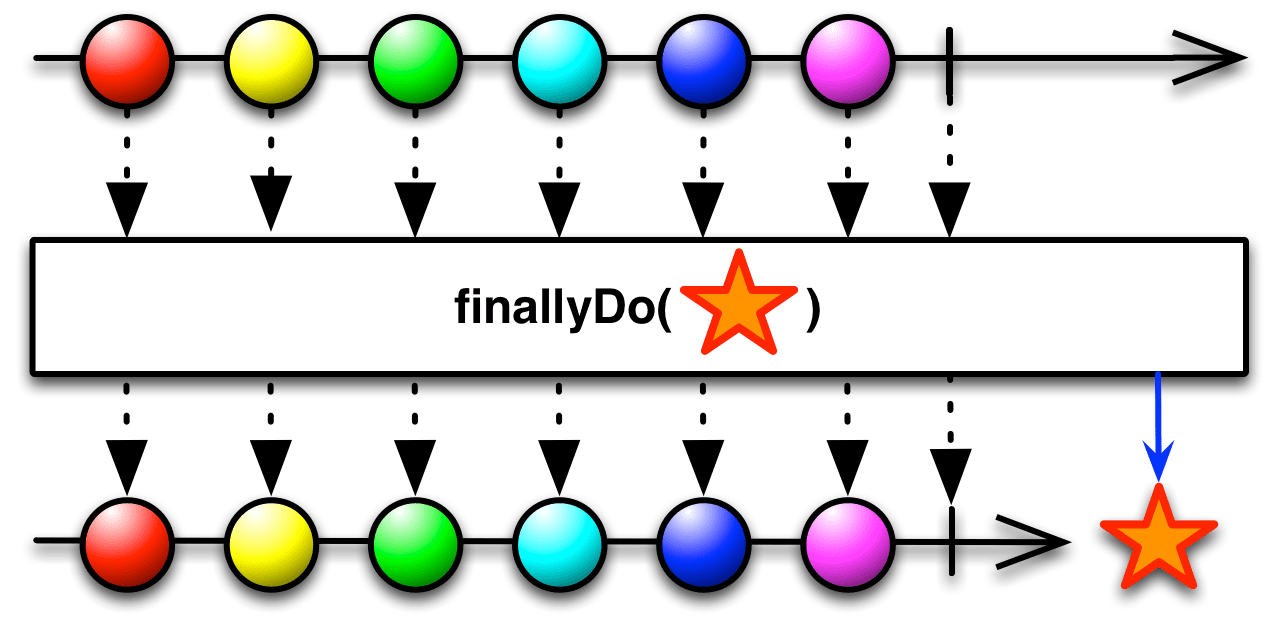
finallyDo is deprecated since RxJava 1.1.1, in favor of doAfterTerminate with the same behavior.
The finallyDo operator registers an Action which will be called just after the resulting Observable terminates, whether normally or with an error.
- Javadoc:
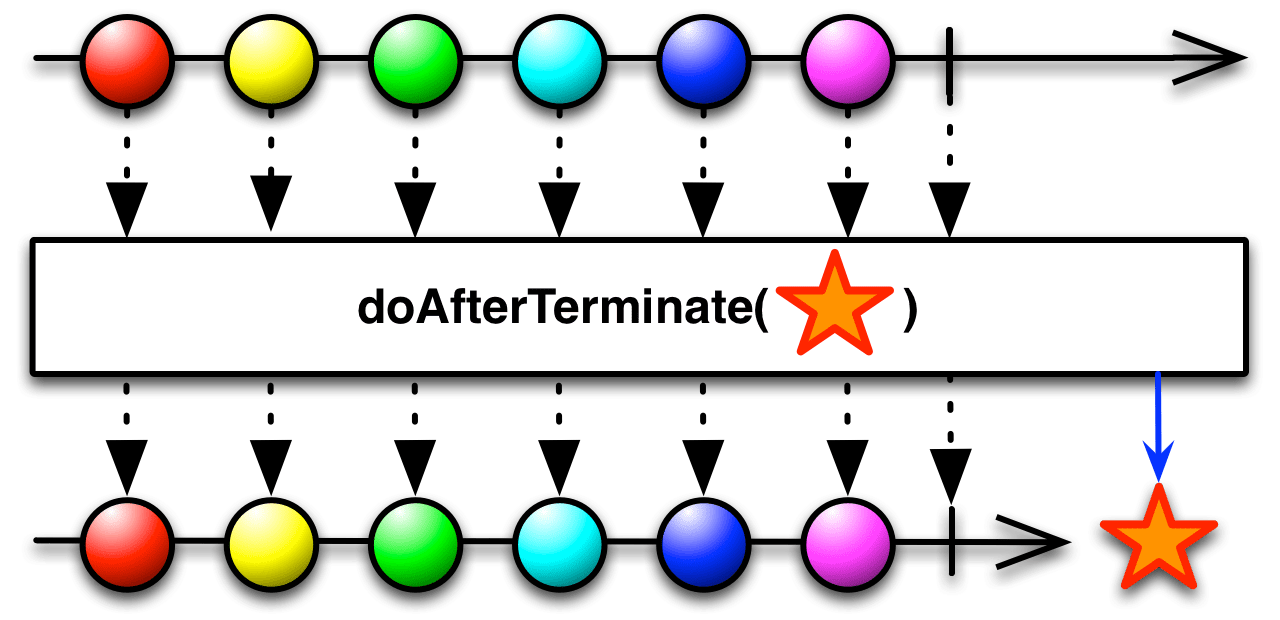
The doAfterTerminate operator registers an Action which will be called just after the resulting Observable terminates, whether normally or with an error.
- Javadoc:

RxJS implements the basic Do operator as do or tap (two names for the same operator). You have two choices for how to use this operator:
/* Using an observer */ var observer = Rx.Observer.create(function (x) { console.log("Do Next: %s", x); }, function (err) { console.log("Do Error: %s", err); }, function () { console.log("Do Completed"); }); var source = Rx.Observable.range(0, 3) .do(observer); var subscription = source.subscribe(function (x) { console.log("Next: %s", x); }, function (err) { console.log("Error: %s", err); }, function () { console.log("Completed"); });
/* Using a function */ var source = Rx.Observable.range(0, 3) .do(function (x) { console.log("Do Next:", x); }, function (err) { console.log("Do Error:", err); }, function () { console.log("Do Completed"); }); var subscription = source.subscribe(function (x) { console.log("Next: %s", x); }, function (err) { console.log("Error: %s", err); }, function () { console.log("Completed"); });
Do Next: 0 Next: 0 Do Next: 1 Next: 1 Do Next: 2 Next: 2 Do Completed Completed
RxJS also implements doOnNext or tapOnNext (two names for the same operator). It is a specialized form of Do that responds only to the onNext case, by calling a callback function you provide as a parameter. You may also optionally pass a second parameter that will be the “ this ” object from the point of view of your callback function when it executes.
Sample Codevar source = Rx.Observable.range(0, 3) .doOnNext(function () { this.log("Do Next: %s", x); }, console); var subscription = source.subscribe(function (x) { console.log("Next: %s", x); }, function (err) { console.log("Error: %s", err); }, function () { console.log("Completed"); });
Do Next: 0 Next: 0 Do Next: 1 Next: 1 Do Next: 2 Next: 2 Completed
RxJS also implements doOnError or tapOnError (two names for the same operator). It is a specialized form of Do that responds only to the onError case, by calling a callback function you provide as a parameter. You may also optionally pass a second parameter that will be the “ this ” object from the point of view of your callback function when it executes.
Sample Codevar source = Rx.Observable.throw(new Error()); .doOnError(function (err) { this.log("Do Error: %s", err); }, console); var subscription = source.subscribe(function (x) { console.log("Next: %s", x); }, function (err) { console.log("Error: %s", err); }, function () { console.log("Completed"); });
Do Error: Error Error: Error
RxJS also implements doOnCompleted or tapOnCompleted (two names for the same operator). It is a specialized form of Do that responds only to the onCompleted case, by calling a callback function you provide as a parameter. You may also optionally pass a second parameter that will be the “ this ” object from the point of view of your callback function when it executes.
Sample Codevar source = Rx.Observable.range(0, 3) .doOnCompleted(function () { this.log("Do Completed"); }, console); var subscription = source.subscribe(function (x) { console.log("Next: %s", x); }, function (err) { console.log("Error: %s", err); }, function () { console.log("Completed"); });
Next: 0 Next: 1 Next: 2 Do Completed Completed
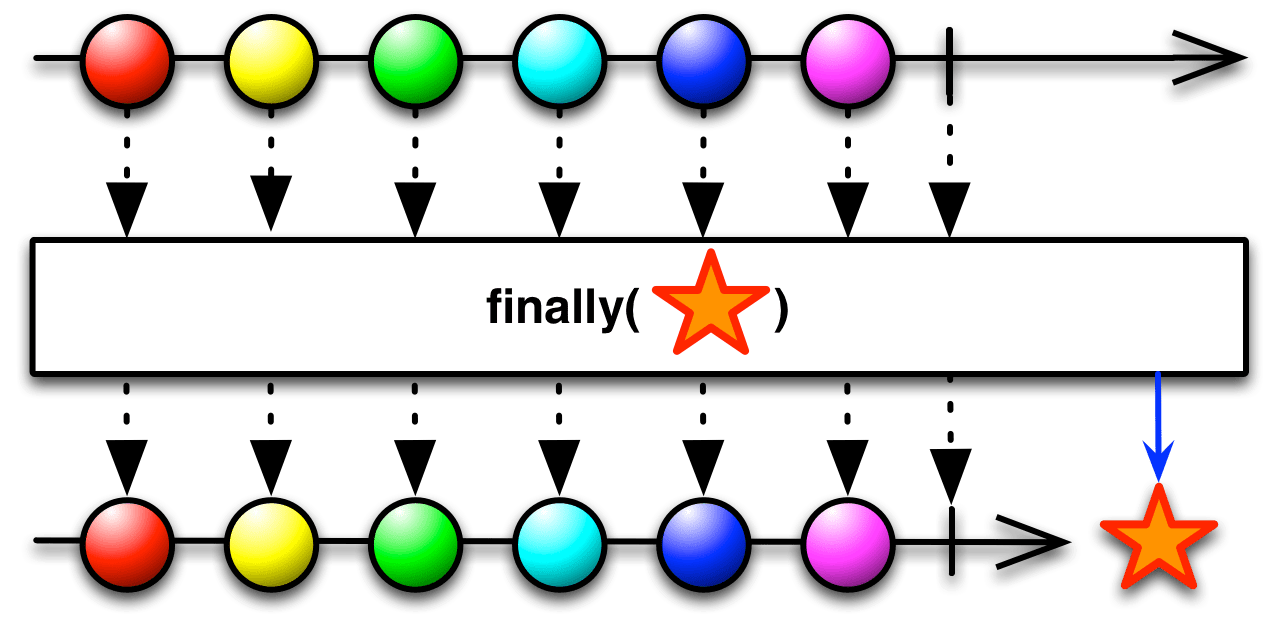
RxJS also implements a finally operator. It takes a function that will be called after the resulting Observable terminates, whether normally (onCompleted) or abnormally (onError).
Sample Codevar source = Rx.Observable.throw(new Error()) .finally(function () { console.log("Finally"); }); var subscription = source.subscribe(function (x) { console.log("Next: " + x); }, function (err) { console.log("Error: " + err); }, function () { console.log("Completed"); });
Error: Error Finally
do / tap , doOnNext / tapOnNext , doOnError / tapOnError , doOnCompleted / tapOnCompleted , and finally are found in each of the following distributions:
- rx.js
- rx.all.js
- rx.all.compat.js
- rx.compat.js
- rx.lite.js
- rx.lite.compat.js
RxPHP implements this operator as do .
Invokes an action for each element in the observable sequence and invokes an action upon graceful or exceptional termination of the observable sequence. This method can be used for debugging, logging, etc. of query behavior by intercepting the message stream to run arbitrary actions for messages on the pipeline. When using do, it is important to note that the Observer may receive additional events after a stream has completed or errored (such as when using a repeat or resubscribing). If you are using an Observable that extends the AbstractObservable, you will not receive these events. For this special case, use the DoObserver. doOnNext, doOnError, and doOnCompleted uses the DoObserver internally and will receive these additional events.
Sample Code//from https://github.com/ReactiveX/RxPHP/blob/master/demo/do/do.php $source = \Rx\Observable::range(0, 3) ->do(function ($x) { echo "Do Next:", $x, PHP_EOL; }, function (Throwable $err) { echo "Do Error:", $err->getMessage(), PHP_EOL; }, function () { echo "Do Completed", PHP_EOL; }); $subscription = $source->subscribe($stdoutObserver);
Do Next:0 Next value: 0 Do Next:1 Next value: 1 Do Next:2 Next value: 2 Do Completed Complete!
RxPHP also has an operator doOnError .
Sample Code//from https://github.com/ReactiveX/RxPHP/blob/master/demo/do/doOnError.php $source = \Rx\Observable::error(new Exception("Oops")) ->doOnError(function (Throwable $err) { echo "Do Error:", $err->getMessage(), PHP_EOL; }); $subscription = $source->subscribe($stdoutObserver);
Do Error:Oops Exception: Oops
RxPHP also has an operator doOnCompleted .
Sample Code//from https://github.com/ReactiveX/RxPHP/blob/master/demo/do/doOnCompleted.php $source = \Rx\Observable::empty() ->doOnCompleted(function () { echo "Do Completed", PHP_EOL; }); $subscription = $source->subscribe($stdoutObserver);
Do Completed Complete!
RxPHP also has an operator finally .
Will call a specified function when the source terminates on complete or error.
Sample Code//from https://github.com/ReactiveX/RxPHP/blob/master/demo/finally/finally.php Rx\Observable::range(1, 3) ->finally(function() { echo "Finally\n"; }) ->subscribe($stdoutObserver);
Next value: 1 Next value: 2 Next value: 3 Complete! Finally
//from https://github.com/ReactiveX/RxPHP/blob/master/demo/finally/finally-error.php Rx\Observable::range(1, 3) ->map(function($value) { if ($value == 2) { throw new \Exception("error"); } return $value; }) ->finally(function() { echo "Finally\n"; }) ->subscribe($stdoutObserver);
Next value: 1 Exception: error Finally
Прикрепляет указанную PHP функцию на указанный хук. Указанная функция сработает в момент события, которое в свою очередь запускается с помощью do_action() .
Хук на который цепляется функция создается (инициализируется) с помощью функции do_action() .
Действия (actions), в отличии от фильтров (add_filter()), нужны, чтобы выполнить какое-либо действие в нужный момент, тогда как фильтры передают и получают обратно данные, которые затем используются.
Неофициально: фильтры - это те же самые события, работают они точно также и их можно использовать как события (вместо add_filter() можно использовать функцию add_action() и наоборот). Например, можно не изменяя возвращать полученные данные, но помимо этого выполнять какую-нибудь операцию (например запись в БД). Правда это бывает нужно очень редко. Все места где нужно вмешаться в код движка, разработчики, пытаются предусмотреть и вставить в это место событие.
✈ 1 раз = 0.000018с = очень быстро | 50000 раз = 0.07с = скорость света | PHP 7.0.8, WP 4.7
Хуков нет.
ВозвращаетВсегда true.
Использование add_action($tag, $function_to_add, $priority, $accepted_args); $tag(строка) (обязательный) Название действия, к которому будем цеплять функцию. $function_to_add(строка/замыкание) (обязательный) Название функции, которая должна быть вызвана во время срабатывания действия, т.е. функция которую цепляем к хуку. Формат передачи функции - обычно строка, . $priority(число) Приоритет выполнения функции. Если на этот же хук "прицеплены" еще функции, то приоритет будет решать последовательность их выполнения. Меньше число - раньше выполняется, т.е. 10 будет выполняться раньше чем 20.По умолчанию: 10 $accepted_args(число) Число аргументов, которые принимает функция. Разумеется действие должно передавать это число аргументов.
По умолчанию: 1 Примеры #1 Обычный хук
Будем отправлять письмо друзьям, при публикации нового поста:
Add_action("publish_post", "email_friends"); function email_friends($post_ID){ $friends = "[email protected], [email protected]"; wp_mail($friends, "sally"s blog updated", "I just put something on my blog: http://blog.example.com"); return $post_ID; }
Точно так же можно зарегистрировать этот хук через add_filter():
Add_filter("publish_post", "email_friends");
#2 Получение аргументаdo_action() передает аргумент в функцию и его можно использовать. В предыдущем примере это был ID поста, но мы его не использовали, потому он нам не был нужен. Теперь, пример того, как использовать передаваемый аргумент:
Add_action("comment_id_not_found", "echo_comment_id", 10, 1); function echo_comment_id($comment_ID){ echo "I just received ". $comment_ID; }
#3 Анонимная функцияВ качестве колбэк функции можно передавать анонимную функцию, например:
Add_action("wp_head", function(){ echo "something"; });
Такие анонимные функции не работают совместно с PHP ускорителями.
#4 Добавление события из PHP классаЕсли для события нужно использовать как-либо метод PHP класса, то во втором аргументе, вместо названия функции, нужно указать массив, где первым аргументом будет название класса (для static метода) или экземпляр класса (для public метода), а вторым название метода этого класса.
Экземпляр класса находится в переменной $this:
// Подключение метода класса за пределами класса add_action("wp_head", array("My_Class", "my_static_method")); class My_Class { public function __construct() { // Подключение метода класса внутри класса add_action("save_post", array($this, "my_public_method")); add_action("save_post", array(__CLASS__, "my_static_method")); } public function my_public_method($post_id) { // код функции } static function my_static_method($post_id) { // код функции } }
ЗаметкиЧтобы узнать сколько аргументов передает действие, найдите его в коде и посмотрите. Например, тут передается 2 аргумента:
Do_action("save_post", $post_ID, $post);
и для такого хука, код зацепки будет выглядеть так:
Add_action("save_post", "my_save_post", 10, 2);
а функция будет иметь 2 аргумента:
Function my_save_post($post_ID, $post){ // здесь код функции }
В этой статье подробно говорится об использовании переменной PHP _SELF.
Что за переменная PHP _SELF?Переменная PHP _SELF возвращает имя и путь к текущему файлу (относительно корня документа). Вы можете использовать эту переменную в атрибуте формы action. Существуют также некоторые нюансы, которые вы должны знать. Мы, конечно, никак не можем обойти стороной эти нюансы.
Давайте рассмотрим несколько примеров.
Echo $_SERVER["PHP_SELF"];
1) Предположим, что ваш php файл расположен по следующему адресу:
Http://www.yourserver.com/form-action.php
В этом случае переменная PHP _SELF будет содержать:
"/form-action.php"
2) Предположим, ваш php файл расположен по такому адресу:
Http://www.yourserver.com/dir1/form-action.php
PHP _SELF будет:
"/dir1/form-action.php"
PHP _SELF в атрибуте формы action. Для чего она там понадобилась?Обычно переменную PHP _SELF используют в атрибуте action тега form . В атрибуте action указывается адрес, по которому будет отослано содержание формы после подтверждения (клик пользователем по кнопке с type="submit"). Как правило это таже самая страница, с которой ушла форма.
Однако, если вы переименуете файл, на который ссылается форма, вам понадобится переименовать название файла в атрибуте action , иначе форма работать не будет.
Переменная PHP _SELF избавит вас от лишних исправлений, так как адрес страницы будет генерироваться автоматически, исходя из названия файла.
Допустим, у вас есть файл с формой form-action.php, и вы хотите, чтобы после подтверждения форма отправлялась на тот же самый файл. Обычно пишут так:
Но вы можете использовать переменную PHP _SELF вместо form-action.php. В этом случае код будет выглядеть: